# Spring Boot 原理深入及源码剖析


<!--more-->


## 1.依赖管理

为什么导入dependency时不需要指定版本? 

spring-boot-starter-parent父依赖启动器的主要作用是进行版本统一管理，那么项目运行依赖的JAR包是从何而来的？

在spring-boot-demo中，有两个核心依赖

```xml
<parent>
  <groupId>org.springframework.boot</groupId>
  <artifactId>spring-boot-starter-parent</artifactId>
  <version>2.6.3</version>
  <relativePath/> <!-- lookup parent from repository -->
</parent>

<dependency>
  <groupId>org.springframework.boot</groupId>
  <artifactId>spring-boot-starter-web</artifactId>
</dependency>
```

### 1.1 spring-boot-starter-parent依赖

`<version>2.6.3</version>` 设置项目统一版本号

进入spring-boot-starter-parent,还有一个父依赖

```xml
<parent>
  <groupId>org.springframework.boot</groupId>
  <artifactId>spring-boot-dependencies</artifactId>
  <version>2.6.3</version>
</parent>
```

继续查看spring-boot-dependencies

```xml
<properties>
    <activemq.version>5.16.3</activemq.version>
    <antlr2.version>2.7.7</antlr2.version>
    <appengine-sdk.version>1.9.93</appengine-sdk.version>
    <artemis.version>2.19.0</artemis.version>
    <aspectj.version>1.9.7</aspectj.version>
    <assertj.version>3.21.0</assertj.version>
    <atomikos.version>4.0.6</atomikos.version>
    <awaitility.version>4.1.1</awaitility.version>
    <build-helper-maven-plugin.version>3.2.0</build-helper-maven-plugin.version>
    <byte-buddy.version>1.11.22</byte-buddy.version>
    <caffeine.version>2.9.3</caffeine.version>
    <cassandra-driver.version>4.13.0</cassandra-driver.version>
    <classmate.version>1.5.1</classmate.version>
    <commons-codec.version>1.15</commons-codec.version>
    <commons-dbcp2.version>2.9.0</commons-dbcp2.version>
    <commons-lang3.version>3.12.0</commons-lang3.version>
    <commons-pool.version>1.6</commons-pool.version>
    <commons-pool2.version>2.11.1</commons-pool2.version>
    <couchbase-client.version>3.2.4</couchbase-client.version>
    <db2-jdbc.version>11.5.7.0</db2-jdbc.version>
    <dependency-management-plugin.version>1.0.11.RELEASE</dependency-management-plugin.version>
    <derby.version>10.14.2.0</derby.version>
  ..........
  ..........
```

从spring-boot-dependencies底层源文件可以看出，该文件通过标签对一些常用技术框架的依赖文件进行了统一版本号管理，例如activemq、spring、tomcat等，都有与Spring Boot 2.6.3版本相匹配的版本，这也是pom.xml引入依赖文件不需要标注依赖文件版本号的原因

需要说明的是，如果pom.xml引入的依赖文件不是 spring-boot-starter-parent管理的，那么在pom.xml引入依赖文件时，需要使用标签指定依赖文件的版本号

### 1.2 spring-boot-starter-web依赖

查看spring-boot-starter-web

```xml
<dependencies>
  <dependency>
    <groupId>org.springframework.boot</groupId>
    <artifactId>spring-boot-starter</artifactId>
    <version>2.6.3</version>
    <scope>compile</scope>
  </dependency>
  <dependency>
    <groupId>org.springframework.boot</groupId>
    <artifactId>spring-boot-starter-json</artifactId>
    <version>2.6.3</version>
    <scope>compile</scope>
  </dependency>
  <dependency>
    <groupId>org.springframework.boot</groupId>
    <artifactId>spring-boot-starter-tomcat</artifactId>
    <version>2.6.3</version>
    <scope>compile</scope>
  </dependency>
  <dependency>
    <groupId>org.springframework</groupId>
    <artifactId>spring-web</artifactId>
    <version>5.3.15</version>
    <scope>compile</scope>
  </dependency>
  <dependency>
    <groupId>org.springframework</groupId>
    <artifactId>spring-webmvc</artifactId>
    <version>5.3.15</version>
    <scope>compile</scope>
  </dependency>
</dependencies>
```

从上述代码可以发现，spring-boot-starter-web依赖启动器的主要作用是提供Web开发场景所需的底层所有依赖

正是如此，在pom.xml中引入spring-boot-starter-web依赖启动器时，就可以实现Web场景开发，而不需要额外导入Tomcat服务器以及其他Web依赖文件等。当然，这些引入的依赖文件的版本号还是由spring-boot-starter-parent父依赖进行的统一管理。

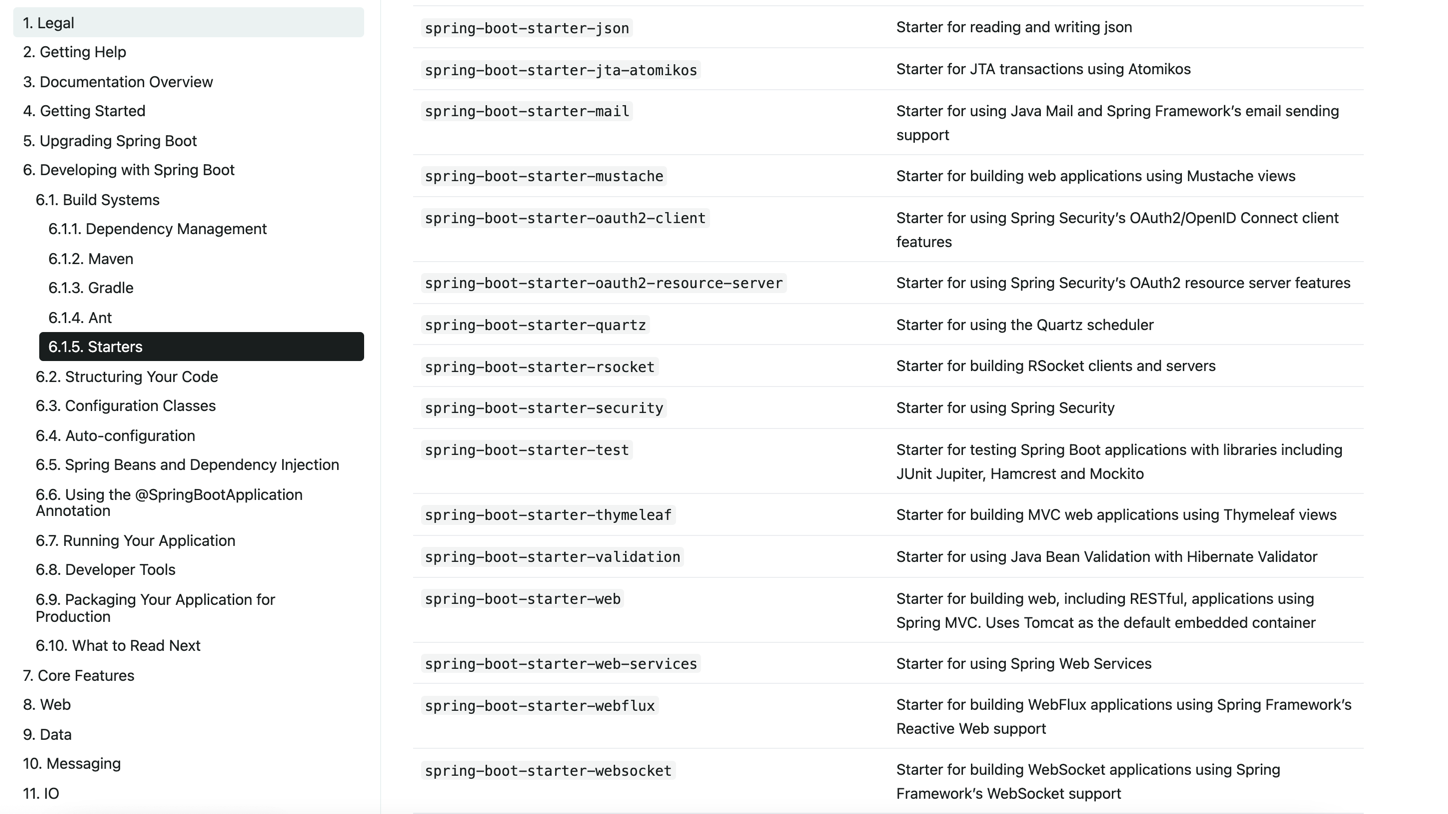
Spring Boot除了提供有上述介绍的Web依赖启动器外，还提供了其他许多开发场景的相关依赖，我们可以打开Spring Boot官方文档，搜索“Starters”关键字查询场景依赖启动器

![img_3](https://img.zhaojq.top/20260727091803748.png "img_3")

列出了Spring Boot官方提供的部分场景依赖启动器，这些依赖启动器适用于不同的场景开发，使用时只需要在pox.xml文件中导入对应的依赖启动器即可。

> 需要说明的是，Spring Boot官方并不是针对所有场景开发的技术框架都提供了场景启动器，例如数据库操作框架MyBatis、阿里巴巴的Druid数据源等，Spring Boot官方就没有提供对应的依赖启动器。为了充分利用Spring Boot框架的优势，在Spring Boot官方没有整合这些技术框架的情况下，MyBatis、Druid等技术框架所在的开发团队主动与Spring Boot框架进行了整合，实现了各自的依赖启动器，例如
>
> - mybatis-spring-boot-starter
> - druid-spring-boot-starter
>
> 等，我们在pom.xml文件中引入这些第三方的依赖启动器时，切记要配置对应的版本号


## 2.自动配置（启动流程）

能够在我们添加jar包依赖的时候，自动为我们配置一些组件的相关配置，我们无需配置或者只需要少量配置就能运行编写的项目

**Spring Boot到底是如何进行自动配置的，都把哪些组件进行了自动配置？**

Spring Boot应用的启动入口是`@SpringBootApplication`注解标注类中的`main()`方法，`@SpringBootApplication`能够扫描Spring组件并自动配置Spring Boot

```java
@SpringBootApplication
public class SpringBootDemoApplication {

	public static void main(String[] args) {
		SpringApplication.run(SpringBootDemoApplication.class, args);
	}

}
```

```java
@Target(ElementType.TYPE)
@Retention(RetentionPolicy.RUNTIME)
@Documented
@Inherited
@SpringBootConfiguration// 标明该类为配置类
@EnableAutoConfiguration// 启动自动配置功能
//包扫描器
@ComponentScan(excludeFilters = { @Filter(type = FilterType.CUSTOM, classes = TypeExcludeFilter.class),
		@Filter(type = FilterType.CUSTOM, classes = AutoConfigurationExcludeFilter.class) })
public @interface SpringBootApplication {
  ......
}
```

从上述源码可以看出，@SpringBootApplication注解是一个组合注解，前面 4 个是注解的元数据信息， 我们主要看后面 3 个注解：@SpringBootConfiguration、@EnableAutoConfiguration、@ComponentScan三个核心注解

### 2.1 @SpringBootConfiguration

```java
@Target(ElementType.TYPE)
@Retention(RetentionPolicy.RUNTIME)
@Documented
@Configuration
@Indexed
public @interface SpringBootConfiguration {
}
```

> 从上述源码可以看出，@SpringBootConfiguration注解内部有一个核心注解@Configuration，该注解是Spring框架提供的，表示当前类为一个配置类（XML配置文件的注解表现形式），并可以被组件扫描器扫描。由此可见，@SpringBootConfiguration注解的作用与@Configuration注解相同，都是标识一个可以被组件扫描器扫描的配置类，只不过@SpringBootConfiguration是被Spring Boot进行了重新封装命名而已

### 2.2 @EnableAutoConfiguration

表示开启自动配置功能，该注解是Spring Boot框架最重要的注解，也是实现自动化配置的注解。同样，查看该注解内部查看源码信息，核心代码具体如下

```java
@Target(ElementType.TYPE)
@Retention(RetentionPolicy.RUNTIME)
@Documented
@Inherited
@AutoConfigurationPackage
@Import(AutoConfigurationImportSelector.class)
public @interface EnableAutoConfiguration {
}
```

可以发现它是一个组合注解，Spring 中有很多以Enable开头的注解，其作用就是借助@Import来收集并注册特定场景相关的bean，并加载到IoC容器。@EnableAutoConfiguration就是借助@Import来收集所有符合自动配置条件的bean定义，并加载到IoC容器。

- @AutoConfigurationPackage

  ```java
  @Target(ElementType.TYPE)
  @Retention(RetentionPolicy.RUNTIME)
  @Documented
  @Inherited
  @Import(AutoConfigurationPackages.Registrar.class)
  public @interface AutoConfigurationPackage {
  }
  ```

  >从上述源码可以看出，@AutoConfigurationPackage注解的功能是由@Import注解实现的，它是spring框架的底层注解，它的作用就是给容器中导入某个组件类，例如`@Import(AutoConfigurationPackages.Registrar.class)`，它就是将Registrar这个组件类导入到容器中
  >
  >```java
  >static class Registrar implements ImportBeanDefinitionRegistrar, DeterminableImports {
  >
  >		@Override
  >		public void registerBeanDefinitions(AnnotationMetadata metadata, BeanDefinitionRegistry registry) {
  >			register(registry, new PackageImports(metadata).getPackageNames().toArray(new String[0]));
  >		}
  >
  >		@Override
  >		public Set<Object> determineImports(AnnotationMetadata metadata) {
  >			return Collections.singleton(new PackageImports(metadata));
  >		}
  >
  >	}
  >```
  >
  >从上述源码可以看出，在Registrar类中有一个`registerBeanDefinitions()`方法，使用Debug模式启动项目， 可以看到选中的部分就是`com.example.springbootdemo`。也就是说，`@AutoConfigurationPackage`注解的主要作用就是将主程序类所在包及所有子包下的组件到扫描到spring容器中。因此 在定义项目包结构时，要求定义的包结构非常规范，项目主程序启动类要定义在最外层的根目录位置，然后在根目录位置内部建立子包和类进行业务开发，这样才能够保证定义的类能够被组件扫描器扫描

- @Import(AutoConfigurationImportSelector.class)

  将`AutoConfigurationImportSelector`这个类导入到spring容器中，

  `AutoConfigurationImportSelector`可以帮助springboot应用将所有符合条件的`@Configuration`配置都加载到当前SpringBoot创建并使用的IoC容器(ApplicationContext)中

  继续研究`AutoConfigurationImportSelector`这个类，通过源码分析这个类中是通过`selectImports`这个方法告诉springboot都需要导入那些组件：

  ```java
  @Override
  	public String[] selectImports(AnnotationMetadata annotationMetadata) {
  		if (!isEnabled(annotationMetadata)) {
  			return NO_IMPORTS;
  		}
  		AutoConfigurationEntry autoConfigurationEntry = getAutoConfigurationEntry(annotationMetadata);
  		return StringUtils.toStringArray(autoConfigurationEntry.getConfigurations());
  	}
  ```

  getAutoConfigurationEntry-->getCandidateConfigurations-->loadFactoryNames-->loadSpringFactories

  ![img_4](https://img.zhaojq.top/20260727091804654.png "img_4")

  **会去读取一个 spring.factories 的文件**

  此处加载了好多jar包里的spring.factories文件，但主要是autoconfigure包里的

  ![img_5](https://img.zhaojq.top/20260727091805187.png "img_5")

`@EnableAutoConfiguration`就是从classpath中搜寻`META-INF/spring.factories`配置文件，并将其中`org.springframework.boot.autoconfigure.EnableutoConfiguration`对应的配置项通过反射（JavaRefletion）实例化为对应的标注了`@Configuration`的JavaConfig形式的配置类，并加载到IOC容器中

> 以刚刚的项目为例，在项目中加入了Web环境依赖启动器，对应的WebMvcAutoConfiguration自动配置类就会生效，打开该自动配置类会发现，在该配置类中通过全注解配置类的方式对Spring MVC运行所需环境进行了默认配置，包括默认前缀、默认后缀、视图解析器、MVC校验器等。而这些自动配置类的本质是传统Spring MVC框架中对应的XML配置文件，只不过在Spring Boot中以自动配置类的形式进行了预先配置。因此，在Spring Boot项目中加入相关依赖启动器后，基本上不需要任何配置就可以运行程序，当然，我们也可以对这些自动配置类中默认的配置进行更改

因此springboot底层实现自动配置的步骤是：

1. springboot应用启动；

2. @SpringBootApplication起作用；

3. @EnableAutoConfiguration；

4. @AutoConfigurationPackage：这个组合注解主要是

   @Import(AutoConfigurationPackages.Registrar.class)，它通过将Registrar类导入到容器中，而Registrar类作用是扫描主配置类同级目录以及子包，并将相应的组件导入到springboot创建管理的容器中；

5. @Import(AutoConfigurationImportSelector.class)：它通过将AutoConfigurationImportSelector类导入到容器中，AutoConfigurationImportSelector类作用是通过selectImports方法执行的过程中，会使用内部工具类SpringFactoriesLoader，查找classpath上所有jar包中的META-INF/spring.factories进行加载，实现将配置类信息交给SpringFactory加载器进行一系列的容器创建过程

### 2.3 @ComponentScan

@ComponentScan注解具体扫描的包的根路径由Spring Boot项目主程序启动类所在包位置决定，在扫描过程中由前面介绍的@AutoConfigurationPackage注解进行解析，从而得到Spring Boot项目主程序启动类所在包的具体位置

```java
|- @SpringBootConfiguration
	|- @Configuration //通过javaConfig的方式来添加组件到IOC容器中
|- @EnableAutoConfiguration
	|- @AutoConfigurationPackage //自动配置包，与@ComponentScan扫描到的添加到IOC
	|- @Import(AutoConfigurationImportSelector.class) //到METAINF/spring.factories中定义的bean添加到IOC容器中
|- @ComponentScan //包扫描
```

## 3.自定义starter

SpringBoot由众多Starter组成（一系列的自动化配置的starter插件），SpringBoot之所以流行，也是因为starter。

starter是SpringBoot非常重要的一部分，可以理解为一个可拔插式的插件，正是这些starter使得使用某个功能的开发者不需要关注各种依赖库的处理，不需要具体的配置信息，由Spring Boot自动通过classpath路径下的类发现需要的Bean，并织入相应的Bean。

例如，你想使用Reids插件，那么可以使用spring-boot-starter-redis；如果想使用MongoDB，可以使用spring-boot-starter-data-mongodb

命名规则：

SpringBoot提供的starter以spring-boot-starter-xxx 的方式命名的。官方建议自定义的starter使用xxx-spring-boot-starter 命名规则。以区分SpringBoot生态提供的starter

- 创建starter工程

  ```xml
  <dependency>
    <groupId>org.springframework.boot</groupId>
    <artifactId>spring-boot-autoconfigure</artifactId>
    <version>2.6.3</version>
  </dependency>
  ```

  ```java
  @EnableConfigurationProperties(CustomBean.class)
  @ConfigurationProperties(prefix = "custombean")
  public class CustomBean {
      private int id;
      private String name;

      public int getId() {
          return id;
      }

      public void setId(int id) {
          this.id = id;
      }

      public String getName() {
          return name;
      }

      public void setName(String name) {
          this.name = name;
      }

      @Override
      public String toString() {
          return "CustomBean{" +
              "id=" + id +
              ", name='" + name + '\'' +
              '}';
      }
  }
  ```

  ```java
  @Configuration
  @ConditionalOnClass //@ConditionalOnClass：当类路径classpath下有指定的类的情况下进行自动配置
  public class MyAutoConfiguration {
      static {
          System.out.println("MyAutoConfiguration init ");
      }

      @Bean
      public CustomBean customBean() {
          return new CustomBean();
      }
  }
  ```

	META-INF/spring.factories

  ```properties
  org.springframework.boot.autoconfigure.EnableAutoConfiguration=\
  com.custom.config.MyAutoConfiguration
  ```

- 使用

  ```xml
  <dependency>
    <groupId>org.example</groupId>
    <artifactId>custom-spring-boot-starter</artifactId>
    <version>1.0-SNAPSHOT</version>
  </dependency>
  ```
  
  ```yml
  custombean:
    id: 1
    name: 自定义starter
  ```
  
  ```java
  @Autowired
  private CustomBean customBean;
  
  @Test
  void testCustomStarter() {
    System.out.println(customBean);
  }
  ```

## 4.执行原理

每个Spring Boot项目都有一个主程序启动类，在主程序启动类中有一个启动项目的main()方法，在该方法中通过执行SpringApplication.run()即可启动整个Spring Boot程序

```java
public static ConfigurableApplicationContext run(Class<?> primarySource, String... args) {
		return run(new Class<?>[] { primarySource }, args);
	}

	public static ConfigurableApplicationContext run(Class<?>[] primarySources, String[] args) {
		return new SpringApplication(primarySources).run(args);
	}
```

### 4.1 SpringApplication实例的初始化创建

```java
public SpringApplication(ResourceLoader resourceLoader, Class<?>... primarySources) {
		this.resourceLoader = resourceLoader;
		Assert.notNull(primarySources, "PrimarySources must not be null");
		this.primarySources = new LinkedHashSet<>(Arrays.asList(primarySources));
		this.webApplicationType = WebApplicationType.deduceFromClasspath();
		this.bootstrapRegistryInitializers = new ArrayList<>(
				getSpringFactoriesInstances(BootstrapRegistryInitializer.class));
		setInitializers((Collection) getSpringFactoriesInstances(ApplicationContextInitializer.class));
		setListeners((Collection) getSpringFactoriesInstances(ApplicationListener.class));
		this.mainApplicationClass = deduceMainApplicationClass();
	}
```

从上述源码可以看出，SpringApplication的初始化过程主要包括4部分，具体说明如下。

- this.webApplicationType = WebApplicationType.deduceFromClasspath()
  用于判断当前webApplicationType应用的类型。deduceFromClasspath()方法用于查看Classpath类路径下是否存在某个特征类，从而判断当前webApplicationType类型是SERVLET应用（Spring 5之前的传统MVC应用）还是REACTIVE应用（Spring 5开始出现的WebFlux交互式应用）  
- this.setInitializers(this.getSpringFactoriesInstances(ApplicationContextInitializer.class))
  用于SpringApplication应用的初始化器设置。在初始化器设置过程中，会使用Spring类加载器SpringFactoriesLoader从META-INF/spring.factories类路径下的META-INF下的spring.factores文件中获取所有可用的应用初始化器类ApplicationContextInitializer。
- this.setListeners(this.getSpringFactoriesInstances(ApplicationListener.class))
  用于SpringApplication应用的监听器设置。监听器设置的过程与上一步初始化器设置的过程基本一样，也是使用SpringFactoriesLoader从META-INF/spring.factories类路径下的META-INF下的spring.factores文件中获取所有可用的监听器类ApplicationListener。
- this.mainApplicationClass = this.deduceMainApplicationClass()
  用于推断并设置项目main()方法启动的主程序启动类

### 4.2 项目的初始化启动

run方法

```java
public ConfigurableApplicationContext run(String... args) {
		long startTime = System.nanoTime();
		DefaultBootstrapContext bootstrapContext = createBootstrapContext();
		ConfigurableApplicationContext context = null;
		configureHeadlessProperty();
  	//1.获取并启动监听器
		SpringApplicationRunListeners listeners = getRunListeners(args);
		listeners.starting(bootstrapContext, this.mainApplicationClass);
		try {
			ApplicationArguments applicationArguments = new DefaultApplicationArguments(args);
      //2.根据springApplicationRunListeners以及参数applicationArguments来准备环境
			ConfigurableEnvironment environment = prepareEnvironment(listeners, bootstrapContext, applicationArguments);
			configureIgnoreBeanInfo(environment);
      //准备banner打印器，即启动的时候打印在consolo上的图案
			Banner printedBanner = printBanner(environment);
      //3.创建spring容器
      /*
      根据webApplicationType进行判断， 确定容器类型，如果该类型为SERVLET类型，会通过反射装载
对应的字节码，也就是AnnotationConfigServletWebServerApplicationContext，接着使用之前
初始化设置的context（应用上下文环境）、environment（项目运行环境）、listeners（运行监听
器）、applicationArguments（项目参数）和printedBanner（项目图标信息）进行应用上下文的组
装配置，并刷新配置
			*/
			context = createApplicationContext();
			context.setApplicationStartup(this.applicationStartup);
      //4.spring容器前置处理
      /*
      这一步主要是在容器刷新之前的准备动作。设置容器环境，包括各种变量等等，其中包含一个非常关键的操
作：将启动类注入容器，为后续开启自动化配置奠定基础
      */
			prepareContext(bootstrapContext, context, environment, listeners, applicationArguments, printedBanner);
      //5.刷新容器
      /*
      开启刷新spring容器，通过refresh方法对整个IOC容器的初始化(包括bean资源的定位，解析，注册等
等)，同时向JVM运行时注册一个关机钩子，在JVM关机时会关闭这个上下文，除非当时它已经关闭
      */
			refreshContext(context);
      //6.spring容器后置处理
      /*
      扩展接口，设计模式中的模板方法，默认为空实现。如果有自定义需求，可以重写该方法。比如打印一些启
动结束log，或者一些其它后置处理
      */
			afterRefresh(context, applicationArguments);
			Duration timeTakenToStartup = Duration.ofNanos(System.nanoTime() - startTime);
			if (this.logStartupInfo) {
				new StartupInfoLogger(this.mainApplicationClass).logStarted(getApplicationLog(), timeTakenToStartup);
			}
      //7.项目启动成功
      /*
      获取EventPublishingRunListener监听器，并执行其started方法，并且将创建的Spring容器传进去
了，创建一个ApplicationStartedEvent事件，并执行ConfigurableApplicationContext 的
publishEvent方法，也就是说这里是在Spring容器中发布事件，并不是在SpringApplication中发布
事件，和前面的starting是不同的，前面的starting是直接向SpringApplication中的监听器发布启
动事件
      */
			listeners.started(context, timeTakenToStartup);
      //8.返回容器
      /*
      用于调用项目中自定义的执行器XxxRunner类，使得在项目启动完成后立即执行一些特定程序。其中，
Spring Boot提供的执行器接口有ApplicationRunner 和CommandLineRunner两种，在使用时只需要
自定义一个执行器类实现其中一个接口并重写对应的run()方法接口，然后Spring Boot项目启动后会立
即执行这些特定程序
      */
			callRunners(context, applicationArguments);
		}
		catch (Throwable ex) {
			handleRunFailure(context, ex, listeners);
			throw new IllegalStateException(ex);
		}
		try {
			Duration timeTakenToReady = Duration.ofNanos(System.nanoTime() - startTime);
			listeners.ready(context, timeTakenToReady);
		}
		catch (Throwable ex) {
			handleRunFailure(context, ex, null);
			throw new IllegalStateException(ex);
		}
		return context;
	}
```

![img_6](https://img.zhaojq.top/20260727091805744.png "img_6")