Spring AOP源码剖析
一、代理对象创建
1.数据准备
@Component
public class TestBeanAspect {

    public void testAop() {
        System.out.println("---------------------- test aop ---------------------");
    }


}

@Component
@Aspect
public class TestAspect {

    @Pointcut("execution(* com.example.demo.entity.TestBeanAspect.testAop(..))")
    public void pointcut() {

    }

    @Before("pointcut()")
    public void before() {
        System.out.println("---------------------- aop before method --------------------");
    }
}

@Configuration
@ComponentScan({"com.example.demo"})
@EnableAspectJAutoProxy //开启spring对注解aop的支持
public class SpringConfig {

    // @Bean
    // public TestBean getTestBean() {
    //     return new TestBean();
    // }

    @Bean
    public TestAspect testAspect() {
        return new TestAspect();
    }

    @Bean
    public TestBeanAspect testBeanAspect() {
        return new TestBeanAspect();
    }
}


@Test
public void test3() {
  ApplicationContext context = new AnnotationConfigApplicationContext(SpringConfig.class);
  TestBeanAspect testBean = context.getBean(TestBeanAspect.class);
  testBean.testAop();
}
2.时机点分析
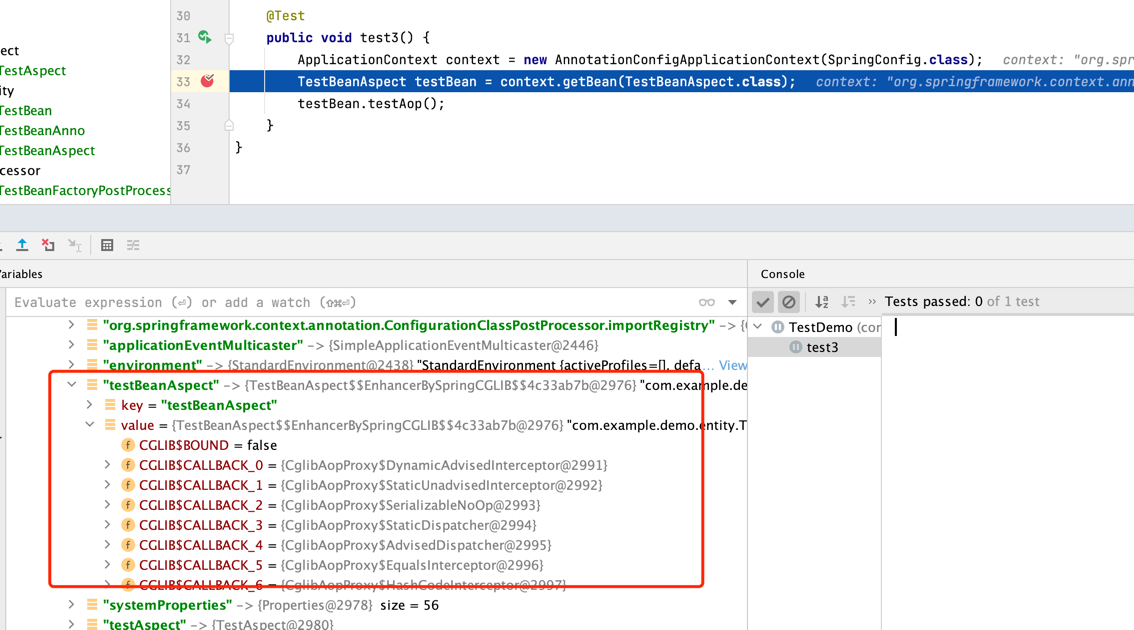
我们发现在 getBean 之前,TestBeanAspect对象已经产⽣(即在第⼀⾏初始化代码中完成),⽽且该对象是⼀个代理对象(Cglib代理对象),我们断定,容器初始化过程中⽬标Ban已经完成了代理,返回了代理对象。
3.代理对象创建流程
由ioc知道,最后初始化bean,位置在
AbstractAutowireCapableBeanFactory#initializeBean方法处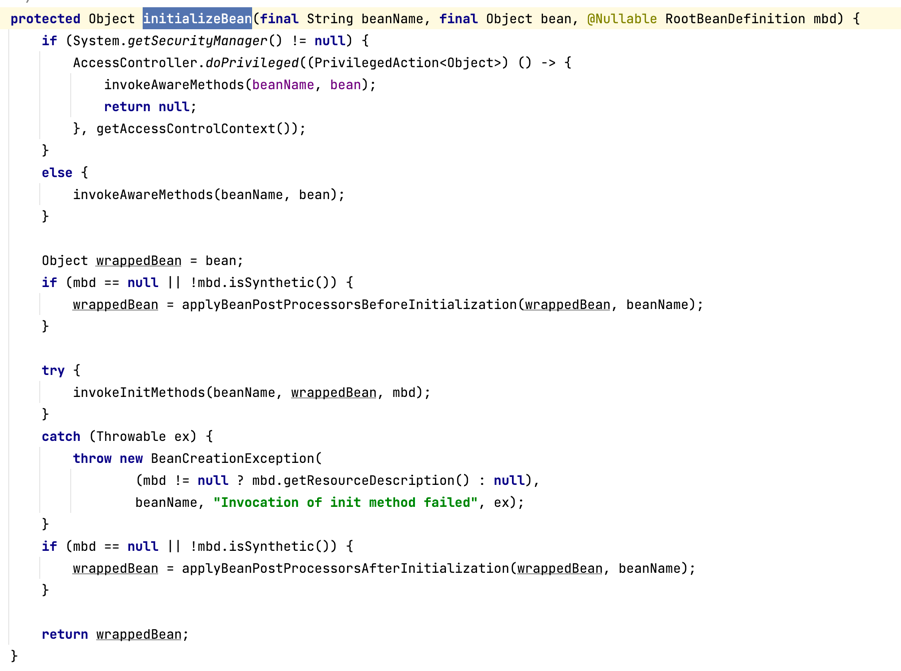
进入
AbstractAutowireCapableBeanFactory#applyBeanPostProcessorsAfterInitialization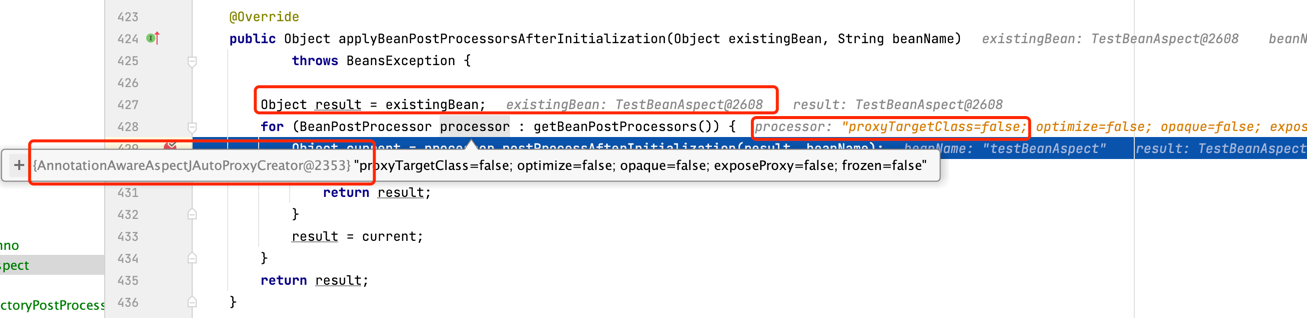
循环执行后置处理器,注意aop后置处理器是
AnnotationAwareAspectJAutoProxyCreator创建代理对象的后置处理器
AbstractAutoProxyCreator#postProcessAfterInitialization
AbstractAutoProxyCreator#wrapIfNecessaryprotected Object wrapIfNecessary(Object bean, String beanName, Object cacheKey) { if (StringUtils.hasLength(beanName) && this.targetSourcedBeans.contains(beanName)) { return bean; } if (Boolean.FALSE.equals(this.advisedBeans.get(cacheKey))) { return bean; } if (isInfrastructureClass(bean.getClass()) || shouldSkip(bean.getClass(), beanName)) { this.advisedBeans.put(cacheKey, Boolean.FALSE); return bean; } // Create proxy if we have advice. //获取所有Advisor 对Advisors和bean的⽅法双层遍历匹配,最终得到⼀个List<Advisor>,即specificInterceptors Object[] specificInterceptors = getAdvicesAndAdvisorsForBean(bean.getClass(), beanName, null); if (specificInterceptors != DO_NOT_PROXY) { this.advisedBeans.put(cacheKey, Boolean.TRUE); //创建代理对象 Object proxy = createProxy( bean.getClass(), beanName, specificInterceptors, new SingletonTargetSource(bean)); this.proxyTypes.put(cacheKey, proxy.getClass()); return proxy; } this.advisedBeans.put(cacheKey, Boolean.FALSE); return bean; }AbstractAutoProxyCreator#createProxyprotected Object createProxy(Class<?> beanClass, @Nullable String beanName, @Nullable Object[] specificInterceptors, TargetSource targetSource) { if (this.beanFactory instanceof ConfigurableListableBeanFactory) { AutoProxyUtils.exposeTargetClass((ConfigurableListableBeanFactory) this.beanFactory, beanName, beanClass); } // 创建代理的⼯作交给ProxyFactory ProxyFactory proxyFactory = new ProxyFactory(); proxyFactory.copyFrom(this); // 根据⼀些情况判断是否要设置proxyTargetClass=true // 如果该值为true,则proxyFactory将会使用CGLIB对目标对象进行代理,默认值为false if (!proxyFactory.isProxyTargetClass()) { if (shouldProxyTargetClass(beanClass, beanName)) { proxyFactory.setProxyTargetClass(true); } else { evaluateProxyInterfaces(beanClass, proxyFactory); } } // 把指定和通⽤拦截对象合并, 并都适配成Advisor Advisor[] advisors = buildAdvisors(beanName, specificInterceptors); proxyFactory.addAdvisors(advisors); proxyFactory.setTargetSource(targetSource); customizeProxyFactory(proxyFactory); proxyFactory.setFrozen(this.freezeProxy); if (advisorsPreFiltered()) { proxyFactory.setPreFiltered(true); } //开始创建代理 return proxyFactory.getProxy(getProxyClassLoader()); }先创建aop proxy工厂,再创建AopProxy
protected final synchronized AopProxy createAopProxy() { if (!this.active) { activate(); } return getAopProxyFactory().createAopProxy(this); }DefaultAopProxyFactory#createAopProxy这⾥决定创建代理对象是⽤JDK Proxy,还是⽤ Cglib 了,最简单的从使⽤⽅⾯使⽤来说:设置
proxyTargetClass=true强制使⽤Cglib 代理,什么参数都不设并且对象类实现了接⼝则默认⽤JDK 代理,如果没有实现接⼝则也必须⽤Cglibpublic AopProxy createAopProxy(AdvisedSupport config) throws AopConfigException { if (config.isOptimize() || config.isProxyTargetClass() || hasNoUserSuppliedProxyInterfaces(config)) { Class<?> targetClass = config.getTargetClass(); if (targetClass == null) { throw new AopConfigException("TargetSource cannot determine target class: " + "Either an interface or a target is required for proxy creation."); } if (targetClass.isInterface() || Proxy.isProxyClass(targetClass)) { return new JdkDynamicAopProxy(config); } return new ObjenesisCglibAopProxy(config); } else { return new JdkDynamicAopProxy(config); } }CglibAopProxy#getProxy(java.lang.ClassLoader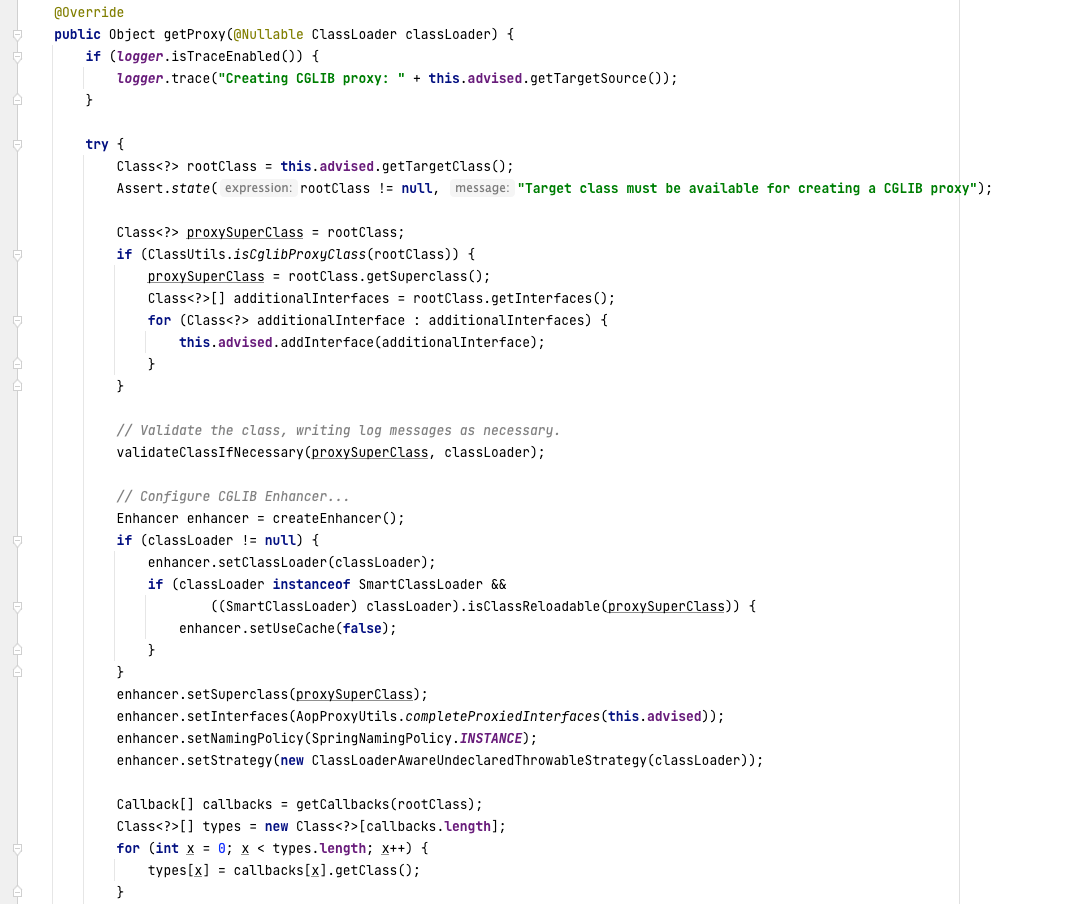
二、Spring 声明式事务控制
声明式事务很⽅便,尤其纯注解模式,仅仅⼏个注解就能控制事务了
思考:这些注解都做了什么?
@EnableTransactionManagement@Transactional
1.@EnableTransactionManagement
@Target(ElementType.TYPE)
@Retention(RetentionPolicy.RUNTIME)
@Documented
@Import(TransactionManagementConfigurationSelector.class)
public @interface EnableTransactionManagement {

	boolean proxyTargetClass() default false;

	AdviceMode mode() default AdviceMode.PROXY;

	int order() default Ordered.LOWEST_PRECEDENCE;

}
使⽤
@Import标签引⼊了TransactionManagementConfigurationSelector类,这个类⼜向容器中导⼊了两个重要的组件AutoProxyRegistrarProxyTransactionManagementConfiguration@Override protected String[] selectImports(AdviceMode adviceMode) { switch (adviceMode) { case PROXY: return new String[] {AutoProxyRegistrar.class.getName(), ProxyTransactionManagementConfiguration.class.getName()}; case ASPECTJ: return new String[] {determineTransactionAspectClass()}; default: return null; } }
2.@Transactional
AutoProxyRegistrarAutoProxyRegistrar类的registerBeanDefinitions⽅法中⼜注册了⼀个组件**InfrastructureAdvisorAutoProxyCreator**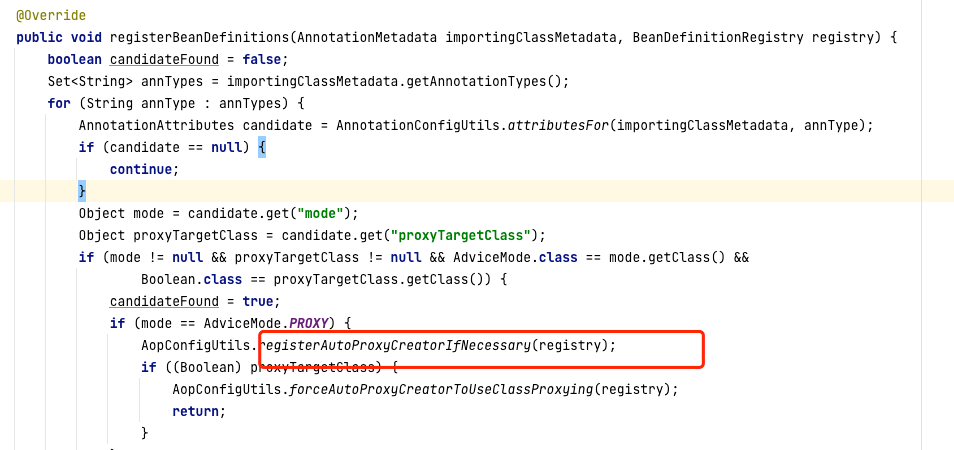
@Nullable
	public static BeanDefinition registerAutoProxyCreatorIfNecessary(
			BeanDefinitionRegistry registry, @Nullable Object source) {

		return registerOrEscalateApcAsRequired(InfrastructureAdvisorAutoProxyCreator.class, registry, source);
	}
这个类是
AbstractAutoProxyCreator的⼦类,实现了SmartInstantiationAwareBeanPostProcessor接⼝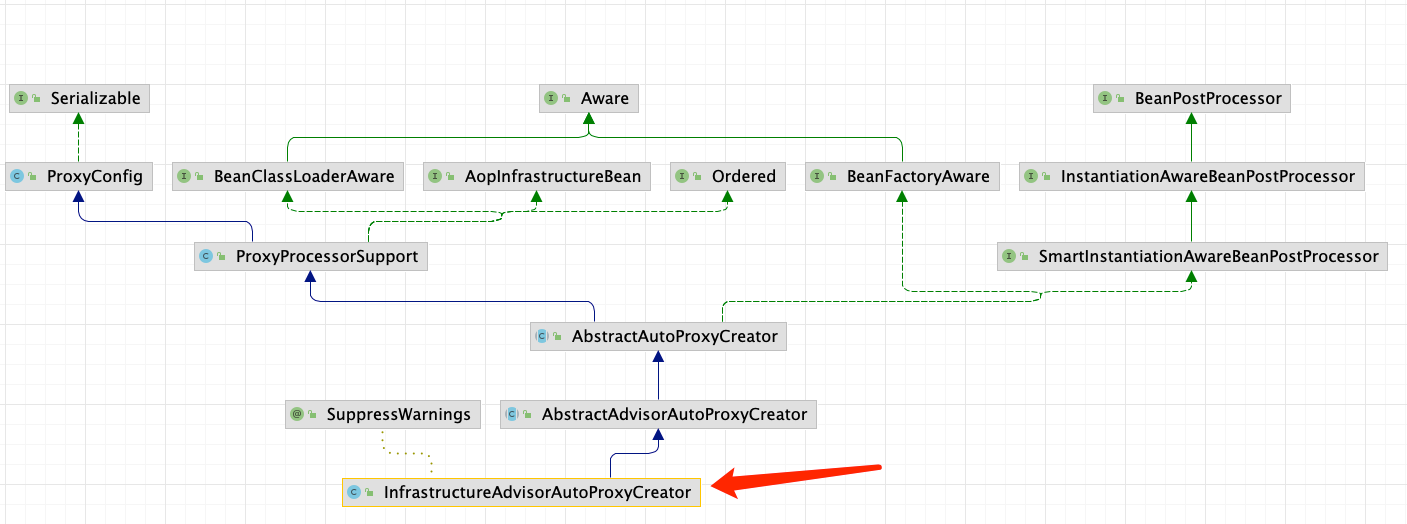
它实现了
SmartInstantiationAwareBeanPostProcessor,说明这是⼀个后置处理器,⽽且跟spring AOP 开启@EnableAspectJAutoProxy时注册的AnnotationAwareAspectJProxyCreator实现的是同⼀个接⼝,所以说,声明式事务是 springAOP 思想的⼀种应⽤ProxyTransactionManagementConfiguration@Configuration public class ProxyTransactionManagementConfiguration extends AbstractTransactionManagementConfiguration { @Bean(name = TransactionManagementConfigUtils.TRANSACTION_ADVISOR_BEAN_NAME) @Role(BeanDefinition.ROLE_INFRASTRUCTURE) public BeanFactoryTransactionAttributeSourceAdvisor transactionAdvisor() { //事务增强器 BeanFactoryTransactionAttributeSourceAdvisor advisor = new BeanFactoryTransactionAttributeSourceAdvisor(); // 向事务增强器中注⼊ 属性解析器 transactionAttributeSource advisor.setTransactionAttributeSource(transactionAttributeSource()); // 向事务增强器中注⼊ 事务拦截器 transactionInterceptor advisor.setAdvice(transactionInterceptor()); if (this.enableTx != null) { advisor.setOrder(this.enableTx.<Integer>getNumber("order")); } return advisor; } @Bean @Role(BeanDefinition.ROLE_INFRASTRUCTURE) // 属性解析器 transactionAttributeSource public TransactionAttributeSource transactionAttributeSource() { return new AnnotationTransactionAttributeSource(); } @Bean @Role(BeanDefinition.ROLE_INFRASTRUCTURE) // 事务拦截器 public TransactionInterceptor transactionInterceptor() { TransactionInterceptor interceptor = new TransactionInterceptor(); interceptor.setTransactionAttributeSource(transactionAttributeSource()); if (this.txManager != null) { interceptor.setTransactionManager(this.txManager); } return interceptor; } }ProxyTransactionManagementConfiguration是⼀个容器配置类,注册了⼀个组件transactionAdvisor,称为事务增强器,然后在这个事务增强器中⼜注⼊了两个属性:即属性解析器
transactionAttributeSource和
事务拦截器
transactionInterceptor属性解析器有⼀个成员变量是annotationParsers,是⼀个集合,可以添加多种注解解析器(TransactionAnnotationParser),我们关注 Spring 的注解解析器,部分源码如下
//对@Trasactional注解的解析
protected TransactionAttribute parseTransactionAnnotation(AnnotationAttributes attributes) {
		RuleBasedTransactionAttribute rbta = new RuleBasedTransactionAttribute();

		Propagation propagation = attributes.getEnum("propagation");
		rbta.setPropagationBehavior(propagation.value());
		Isolation isolation = attributes.getEnum("isolation");
		rbta.setIsolationLevel(isolation.value());
		rbta.setTimeout(attributes.getNumber("timeout").intValue());
		rbta.setReadOnly(attributes.getBoolean("readOnly"));
		rbta.setQualifier(attributes.getString("value"));

		List<RollbackRuleAttribute> rollbackRules = new ArrayList<>();
		for (Class<?> rbRule : attributes.getClassArray("rollbackFor")) {
			rollbackRules.add(new RollbackRuleAttribute(rbRule));
		}
		for (String rbRule : attributes.getStringArray("rollbackForClassName")) {
			rollbackRules.add(new RollbackRuleAttribute(rbRule));
		}
		for (Class<?> rbRule : attributes.getClassArray("noRollbackFor")) {
			rollbackRules.add(new NoRollbackRuleAttribute(rbRule));
		}
		for (String rbRule : attributes.getStringArray("noRollbackForClassName")) {
			rollbackRules.add(new NoRollbackRuleAttribute(rbRule));
		}
		rbta.setRollbackRules(rollbackRules);

		return rbta;
	}
TransactionInterceptor 事务拦截器如下

上述组件如何关联起来的?
事务拦截器实现了MethodInterceptor接⼝,追溯⼀下上⾯提到的InfrastructureAdvisorAutoProxyCreator后置处理器,它会在代理对象执⾏⽬标⽅法的时候获取其拦截器链,⽽拦截器链就是这个TransactionInterceptor,这就把这两个组件联系起来;
构造⽅法传⼊PlatformTransactionManager(事务管理器)、TransactionAttributeSource(属性解析器),但是追溯⼀下上⾯贴的ProxyTransactionManagementConfiguration的源码,在注册事务拦截器的时候并没有调⽤这个带参构造⽅法,⽽是调⽤的⽆参构造⽅法,然后再调⽤set⽅法注⼊这两个属性,效果⼀样。
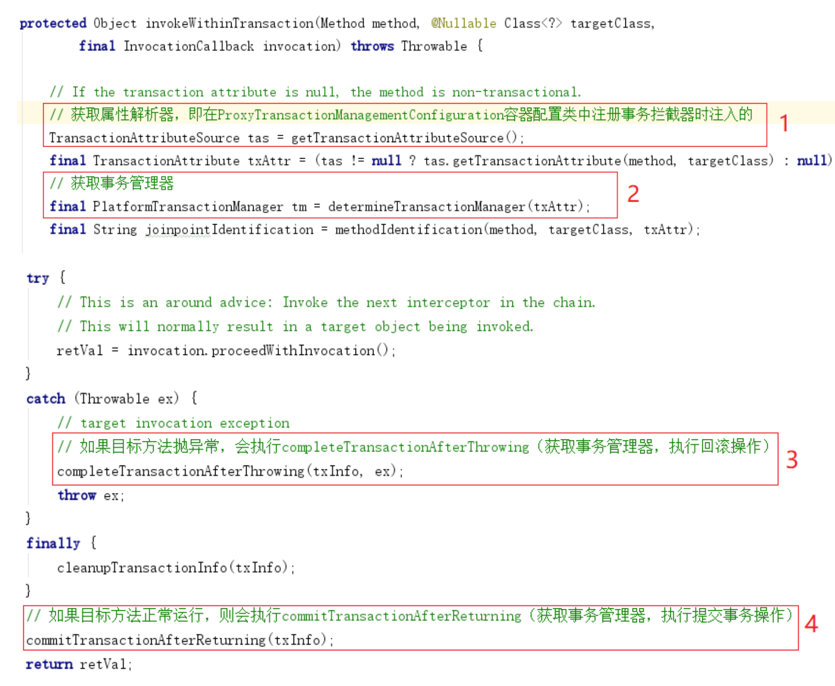
invokeWithinTransaction方法,源码如下