Seata AT模式
一. 案例创建
创建示例工程 parent-seata-demo: https://gitee.com/ixinglan/parent-seata-demo.git
初始化4个sql仓库 seata_bussiness/seata_order/seata_points/seata_storage
启动4个服务, 测试(测试时调用demo-bussiness的接口)
http://localhost:8000/test1正常访问数据分别⼊库
http://localhost:8000/test2访问出错库存不⾜,导致服务调⽤失败.则观察数据库,经发现订单与积分数据库都已改变,⽽库存数据库没有减少库存,所以不满⾜事务的特性.
二. AT模式介绍
AT模式是⼀种⽆侵⼊的分布式事务解决⽅案。在AT模式下,⽤户只需关注⾃⼰的“业务SQL”,⽤户的“业务SQL”作为⼀阶段,Seata框架会⾃动⽣成事务的⼆阶段提交和回滚操作。
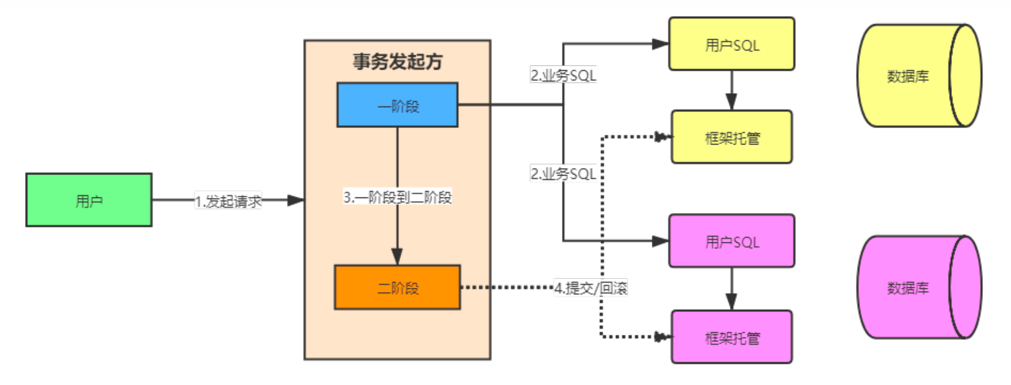
三. AT模式原理
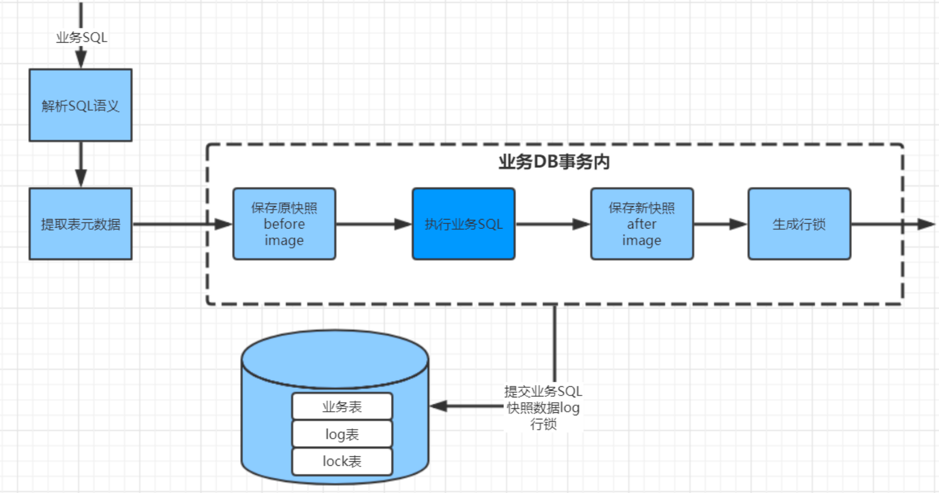
一阶段
在⼀阶段,Seata会拦截“业务SQL”,⾸先解析SQL语义,找到“业务SQL”要更新的业务数据,在业务数据被更新前,将其保存成“beforeimage”,然后执⾏“业务SQL”更新业务数据,在业务数据更新之后,再将其保存成“afterimage”,最后⽣成⾏锁。以上操作全部在⼀个数据库事务内完成,这样保证了⼀阶段操作的原⼦性。
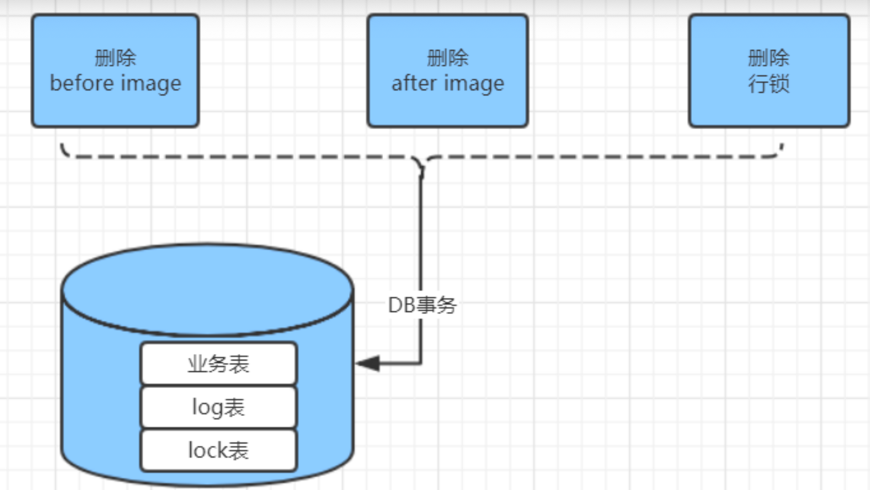
二阶段
提交
⼆阶段如果是提交的话,因为“业务SQL”在⼀阶段已经提交⾄数据库,所以Seata框架只需将⼀阶段保存的快照数据和⾏锁删掉,完成数据清理即可。
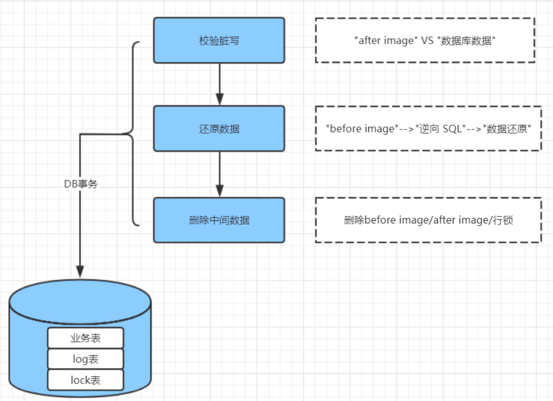
回滚
⼆阶段如果是回滚的话,Seata就需要回滚⼀阶段已经执⾏的“业务SQL”,还原业务数据。回滚⽅式便是⽤“beforeimage”还原业务数据;但在还原前要⾸先要校验脏写,对⽐“数据库当前业务数据”和“afterimage”,如果两份数据完全⼀致就说明没有脏写,可以还原业务数据,如果不⼀致就说明有脏写,出现脏写就需要转⼈⼯处理。
AT模式的⼀阶段、⼆阶段提交和回滚均由Seata框架⾃动⽣成,⽤户只需编写“业务SQL”,便能轻松接⼊分布式事务,AT模式是⼀种对业务⽆任何侵⼊的分布式事务解决⽅案。
四. AT模式改造
4.1 TC全局事务协调器
SeataServer就是TC,直接从官⽅仓库下载启动即可,下载地址:https://github.com/seata/sea ta/releases
下载后作以下修改
registry.conf修改(/conf目录下)
registry type=“nacos”
config type=“nacos”
向nacos中添加配置信息
下载配置config.txt https://github.com/seata/seata/tree/develop/script/config-center
将config.txt放置在与 /bin文件同级目录下
修改config.txt配置信息
store.mode = db
store.db.url=jdbc:mysql://127.0.0.1:3306/seata?useUnicode=true
store.db.user=root
store.db.password=root
注意要创建seata数据库: 初始化sql从 https://github.com/seata/seata/tree/develop/script/server/db 获取
全局事务分组配置
service.vgroupMapping.default_tx_group=default #我们可以修改key中default_tx_group为自定义名称, value值:default也可修改
service.default.grouplist=127.0.0.1:8091 #如果上面value值修改,则此配置中key值 default也与上面value值个同

# 用法在下面有说明
使⽤nacos-config.sh⽤于向Nacos中添加配置
下载地址:https://github.com/seata/seata/tree/develop/script/config-center/nacos
放置在conf目录下,并执行,即可将config.txt中的配置配置到nacos中
执行
sh nacos-config.sh -h 127.0.0.1登录nacos查看配置信息
启动seata-server, 即可看到seata-server自身的注册信息
4.2 TM/RM端整合seata
在三个业务库中分别添加 undo_log表
来记录每个RM的事务信息,主要包含数据修改前,后的相关信息,⽤于回滚处理,所以在所有数据库中分别执⾏
CREATE TABLE `undo_log`
(
    `id`            bigint(20)   NOT NULL AUTO_INCREMENT,
    `branch_id`     bigint(20)   NOT NULL,
    `xid`           varchar(100) NOT NULL,
    `context`       varchar(128) NOT NULL,
    `rollback_info` longblob     NOT NULL,
    `log_status`    int(11)      NOT NULL,
    `log_created`   datetime     NOT NULL,
    `log_modified`  datetime     NOT NULL,
    `ext`           varchar(100) DEFAULT NULL,
    PRIMARY KEY (`id`),
    UNIQUE KEY `ux_undo_log` (`xid`, `branch_id`)
) ENGINE = InnoDB
  AUTO_INCREMENT = 1
  DEFAULT CHARSET = utf8;
整合步骤图
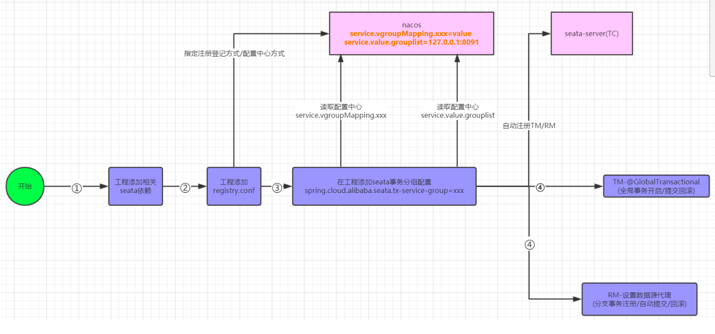
事务分组

整合步骤
Parent pom中引入seata依赖管理
<dependencyManagement>
        <dependencies>
            <!-- seata版本管理, ⽤于锁定⾼版本的seata-->
            <dependency>
                <groupId>io.seata</groupId>
                <artifactId>seata-all</artifactId>
                <version>1.3.0</version>
            </dependency>
        </dependencies>
    </dependencyManagement>
demo-common-db中添加seata依赖
因为我们抽出来demo-common-db,其他模块依赖了demo-common-db,所以只需这儿添加即可
 <!--seata依赖-->
<dependency>
  <groupId>com.alibaba.cloud</groupId>
  <artifactId>spring-cloud-alibaba-seata</artifactId>
  <!--排除低版本seata依赖-->
  <exclusions>
    <exclusion>
      <groupId>io.seata</groupId>
      <artifactId>seata-all</artifactId>
    </exclusion>
  </exclusions>
</dependency>
<!--添加⾼版本seata依赖-->
<dependency>
  <groupId>io.seata</groupId>
  <artifactId>seata-all</artifactId>
  <version>1.3.0</version>
</dependency>
demo-common-db中添加registry.conf(把seata-server中的复制过来即可)
demo-common-db 添加公共配置 application-seata.yml
logging:
  level:
    io.seata: debug

spring:
  cloud:
    alibaba:
      seata:
        tx-service-group: default_tx_group
在其他每个模块中引入配置文件
profiles
 active: seata
也可次上一步中的配置信息分别添加到每个模块中
创建数据源代理
import com.alibaba.druid.pool.DruidDataSource;
import io.seata.rm.datasource.DataSourceProxy;
import org.springframework.boot.context.properties.ConfigurationProperties;
import org.springframework.context.annotation.Bean;
import org.springframework.context.annotation.Configuration;
import org.springframework.context.annotation.Primary;

import javax.sql.DataSource;

/**
 * 数据源代理
 *
 * @author zhaojianqiang
 */
@Configuration
public class DataSourceConfiguration {

    /**
     * 使⽤druid连接池
     *
     * @return
     */
    @Bean
    @ConfigurationProperties(prefix = "spring.datasource")
    public DataSource druidDataSource() {
        return new DruidDataSource();
    }

    /**
     * 设置数据源代理-,完成分⽀事务注册/事务提交与回滚等操作
     *
     * @param druidDataSource
     * @return
     */
    @Primary //设置⾸选数据源对象
    @Bean("dataSource")
    public DataSourceProxy dataSource(DataSource druidDataSource) {
        return new DataSourceProxy(druidDataSource);
    }
}
启动扫描配置类,分别加载每个⼯程的启动类中
@SpringBootApplication(scanBasePackages = "com.example", exclude = DataSourceAutoConfiguration.class)TM端service方法添加 @GlobalTransactional 注解
@GlobalTransactional(rollbackFor = Exception.class, timeoutMills = 6000, name = "sale")启动各个服务,我们发现分布式事务生效了
可以将事务timeoutMills设置时间长一点, debug观察各个表数据变化