NIO编程
示例代码:https://gitee.com/ixinglan/rpc-demo.git nio-demo
1.NIO介绍
Java NIO 全称java non-blocking IO ,是指 JDK 提供的新 API。从 JDK1.4 开始,Java 提供了一系列改进的输入/输出的新特性,被统称为 NIO(即 New IO),是同步非阻塞的.
- NIO 有三大核心部分:Channel(通道),Buffer(缓冲区), Selector(选择器)
- NIO是 面向缓冲区编程的。数据读取到一个缓冲区中,需要时可在缓冲区中前后移动,这就增加了处理过程中的灵活性,使用它可以提供非阻塞式的高伸缩性网络
- Java NIO 的非阻塞模式,使一个线程从某通道发送请求或者读取数据,但是它仅能得到目前可用的数据,如果目前没有数据可用时,就什么都不会获取,而不是保持线程阻塞,所以直至数据变的可以读取之前,该线程可以继续做其他的事情。 非阻塞写也是如此,一个线程请求写入一些数据到某通道,但不需要等待它完全写入, 这个线程同时可以去做别的事情。通俗理解:NIO 是可以做到用一个线程来处理多个操作的。假设有 10000 个请求过来,根据实际情况,可以分配50 或者 100 个线程来处理。不像之前的阻塞 IO 那样,非得分配 10000 个
2.NIO与BIO的比较
- BIO 以流的方式处理数据,而 NIO 以缓冲区的方式处理数据,缓冲区 I/O 的效率比流 I/O 高很多
- BIO 是阻塞的,NIO则是非阻塞的
- BIO 基于字节流和字符流进行操作,而 NIO 基于 Channel(通道)和 Buffer(缓冲区)进行操作,数据总是从通道读取到缓冲区中,或者从缓冲区写入到通道中。Selector(选择器)用于监听多个通道的事件(比如:连接请求, 数据到达等),因此使用单个线程就可以监听多个客户端通道
3.NIO三大核心原理

- 每个 channel 都会对应一个 Buffer
- Selector 对应一个线程, 一个线程对应多个 channel(连接)
- 每个 channel 都注册到 Selector选择器上
- Selector不断轮询查看Channel上的事件, 事件是通道Channel非常重要的概念
- Selector 会根据不同的事件,完成不同的处理操作
- Buffer 就是一个内存块 , 底层是有一个数组
- 数据的读取写入是通过 Buffer, 这个和 BIO , BIO 中要么是输入流,或者是输出流, 不能双向,但是NIO 的 Buffer 是可以读也可以写 , channel 是双向的.
4.缓冲区(Buffer)
4.1 基本介绍
缓冲区(Buffer):缓冲区本质上是一个可以读写数据的内存块,可以理解成是一个数组,该对象提供了一组方法,可以更轻松地使用内存块,,缓冲区对象内置了一些机制,能够跟踪和记录缓冲区的状态变化情况。Channel 提供从网络读取数据的渠道,但是读取或写入的数据都必须经由 Buffer.
4.2 Buffer常用api介绍
buffer及其子类

缓冲区对象创建
方法名 说明 static ByteBuffer allocate(长度) 创建byte类型的指定长度的缓冲区 static ByteBuffer wrap(byte[] array) 创建一个有内容的byte类型缓冲区 /** * @author zhaojianqiang * * 创建缓冲区buffer */ public class BufferDemo1 { public static void main(String[] args) { //1.创建一个指定长度缓冲区,以byteBuffer为例 ByteBuffer byteBuffer = ByteBuffer.allocate(5); for (int i = 0; i < 5; i++) { System.out.println(byteBuffer.get()); } // byteBuffer.get();//此处会报错,超过了缓冲区长度 //2.创建一个有内容的缓冲区 ByteBuffer wrap = ByteBuffer.wrap("hello".getBytes()); for (int i = 0; i < 5; i++) { System.out.println(wrap.get()); } } } 0 0 0 0 0 104 101 108 108 111缓冲区对象添加数据
方法名 说明 int position()/position(int newPosition) 获得当前要操作的索引/修改当前要操作的索引位置 int limit()/limit(int newLimit) 最多能操作到哪个索引/修改最多能操作的索引位置 int capacity() 返回缓冲区的总长度 int remaining()/boolean hasRemaining() 还有多少能操作索引个数/是否还有能操作 put(byte b)/put(byte[] src) 添加一个字节/添加字节数组 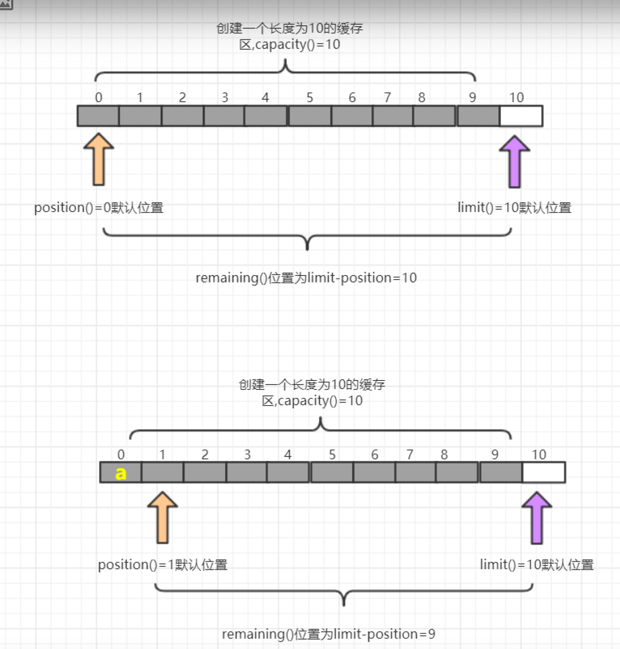
@Test
public void test4() {
    //1.创建一个指定长度的缓冲区, 以ByteBuffer为例
    ByteBuffer byteBuffer = ByteBuffer.allocate(10);
    System.out.println(byteBuffer.position());//0 获取当前索引所在位置
    System.out.println(byteBuffer.limit());//10 最多能操作到哪个索引
    System.out.println(byteBuffer.capacity());//10 返回缓冲区总长度
    System.out.println(byteBuffer.remaining());//10 还有多少个能操作

    System.out.println("----------------------------");
    //添加一个字节数组
    byteBuffer.put("abc".getBytes());
    System.out.println(byteBuffer.position());//3 获取当前索引所在位置
    System.out.println(byteBuffer.limit());//10 最多能操作到哪个索引
    System.out.println(byteBuffer.capacity());//10 返回缓冲区总长度
    System.out.println(byteBuffer.remaining());//7 还有多少个能操作

    System.out.println("----------------------------");
    byteBuffer.put("012345".getBytes());
    System.out.println(byteBuffer.position());//9 获取当前索引所在位置
    System.out.println(byteBuffer.limit());//10 最多能操作到哪个索引
    System.out.println(byteBuffer.capacity());//10 返回缓冲区总长度
    System.out.println(byteBuffer.remaining());//1 还有多少个能操作
    System.out.println(byteBuffer.hasRemaining());// true 是否还能有操作的数组

    //当添加超过缓冲区的长度时会报错
    // byteBuffer.put("fg".getBytes());

    System.out.println("----------------------------");
    byteBuffer.put("f".getBytes());
    System.out.println(byteBuffer.position());//10 获取当前索引所在位置
    System.out.println(byteBuffer.limit());//10 最多能操作到哪个索引
    System.out.println(byteBuffer.capacity());//10 返回缓冲区总长度
    System.out.println(byteBuffer.remaining());//0 还有多少个能操作
    System.out.println(byteBuffer.hasRemaining());// true 是否还能有操作的数组

    System.out.println("----------------------------");
    // 如果缓存区存满后, 可以调整position位置可以重复写,这样会覆盖之前存入索引的对应的值
    byteBuffer.position(0);
    byteBuffer.put("012345".getBytes());
}
缓冲区对象读取数据
方法名 说明 flip() 写切换读模式 limit设置position位置, position设置0 get() 读一个字节 get(byte[] dst) 读多个字节 get(int index) 读指定索引的字节 rewind() 将position设置为0,可以重复读 clear() 切换写模式 position设置为0 , limit 设置为 capacity array() 将缓冲区转换成字节数组返回 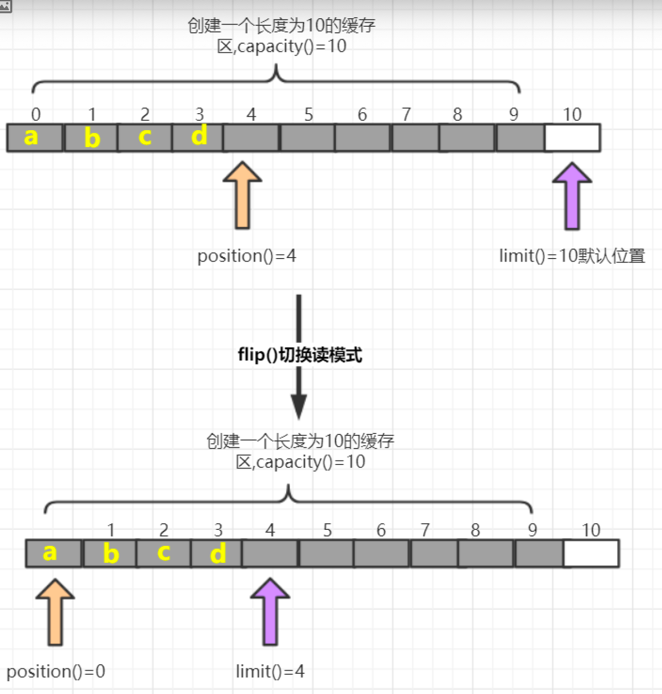
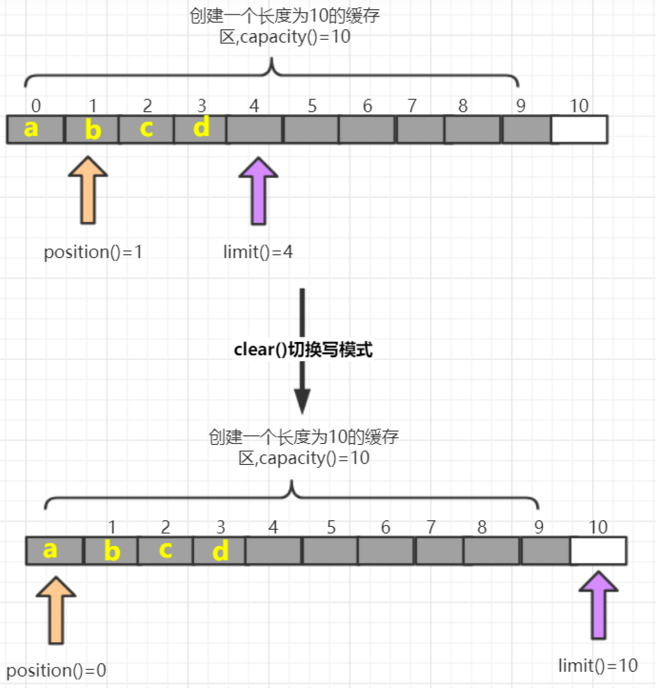
package buffer;

import org.junit.Test;

import java.nio.ByteBuffer;

/**
 * @author zhaojianqiang
 * <p>
 * 从缓冲区中读取数据
 */
public class BufferDemo3 {

    @Test
    public void test1() {
        //1.创建一个指定长度的缓冲区
        ByteBuffer allocate = ByteBuffer.allocate(10);
        allocate.put("0123".getBytes());
        System.out.println("position:" + allocate.position());//4
        System.out.println("limit:" + allocate.limit());//10
        System.out.println("capacity:" + allocate.capacity());//10
        System.out.println("remaining:" + allocate.remaining());//6

        //切换读模式
        System.out.println("读取数据---------------------------");
        allocate.flip();
        System.out.println("position:" + allocate.position());//0
        System.out.println("limit:" + allocate.limit());//4
        System.out.println("capacity:" + allocate.capacity());//10
        System.out.println("remaining:" + allocate.remaining());//4
        for (int i = 0; i < allocate.limit(); i++) {
            System.out.println(allocate.get());
        }

        //读取完毕后,继续读取会报错,超过limit值
        // System.out.println("读取超过limit-------------------");
        // System.out.println(allocate.get());

        //读取指定索引字节
        System.out.println("读取指定索引字节--------------");
        System.out.println(allocate.get(1));

        System.out.println("读取多个字节--------------");
        //重复读
        allocate.rewind();
        byte[] bytes = new byte[4];
        allocate.get(bytes);
        System.out.println(new String(bytes));
        System.out.println("position:" + allocate.position());//0

        //将缓冲区转化字节数组返回
        System.out.println("将缓冲区转化字节数组返回--------------");
        byte[] array = allocate.array();
        System.out.println(new String(array));


        // 切换写模式,覆盖之前索引所在位置的值
        System.out.println("写模式--------------");
        allocate.clear();
        allocate.put("abc".getBytes());
        System.out.println(new String(allocate.array()));
    }


}
注意事项:
- capacity:容量(长度)limit: 界限(最多能读/写到哪里)posotion:位置(读/写哪个索引)
- 获取缓冲区里面数据之前,需要调用flip方法
- 再次写数据之前,需要调用clear方法,但是数据还未消失,等再次写入数据,被覆盖了才会消失。
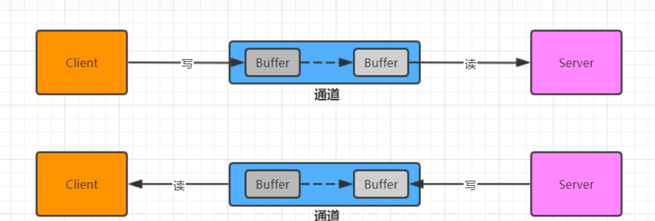
5.通道(Channel)
5.1 基本介绍
通常来说NIO中的所有IO都是从 Channel(通道) 开始的。NIO 的通道类似于流,但有些区别如下:
- 通道可以读也可以写,流一般来说是单向的(只能读或者写,所以之前我们用流进行IO操作的时候需要分别创建一个输入流和一个输出流)
- 通道可以异步读写
- 通道总是基于缓冲区Buffer来读写
5.2 channel常用类介绍
channel接口
常用的Channel实现类类有
- FileChannel 用于文件数据读写
- DatagramChannel 用于 UDP 的数据读写
- ServerSocketChannel 用于 TCP 的数据读写
- SocketChannel 用于 TCP 的数据读写
5.3 ServerSocketChannel
服务端实现步骤
- 打开一个服务端通道
- 绑定对应的端口号
- 通道默认是阻塞的,需要设置为非阻塞
- 检查是否有客户端连接 有客户端连接会返回对应的通道
- 获取客户端传递过来的数据,并把数据放在byteBuffer这个缓冲区中
- 给客户端回写数据
- 释放资源
package channel;

import java.io.IOException;
import java.net.InetSocketAddress;
import java.nio.ByteBuffer;
import java.nio.channels.ServerSocketChannel;
import java.nio.channels.SocketChannel;
import java.nio.charset.StandardCharsets;

/**
 * @author zhaojianqiang
 */
public class NioServer {
    public static void main(String[] args) throws IOException, InterruptedException {
        //1.打开一个服务通道
        ServerSocketChannel serverSocketChannel = ServerSocketChannel.open();
        //2.绑定端口
        serverSocketChannel.bind(new InetSocketAddress(9999));
        //3.设置为非阻塞
        serverSocketChannel.configureBlocking(false);

        System.out.println("服务端启动成功------------------");
        while (true) {
            //4.检查客户端连接   有连接会返回对应的通道,否则返回null
            SocketChannel accept = serverSocketChannel.accept();
            if (accept == null) {
                System.out.println("没有客户端连接");
                Thread.sleep(1000);
                continue;
            }

            //5.获取客户端数据,并把数据放在byteBuffer缓冲区
            ByteBuffer allocate = ByteBuffer.allocate(1024);
            //>0:表示本次读到的有效字节个数; 0:表示本次没有读到有效字节; -1:表示读到了末尾
            int read = accept.read(allocate);
            System.out.println("客户端消息:" + new String(allocate.array(), 0, read, StandardCharsets.UTF_8));

            //6.给客户端写数据
            accept.write(ByteBuffer.wrap("收到".getBytes(StandardCharsets.UTF_8)));
            //7.释放资源
            accept.close();
        }
    }
}
5.4 SocketChannle
实现步骤
打开通道
设置连接IP和端口号
写出数据
读取服务器写回的数据
释放资源
package channel;

import java.io.IOException;
import java.net.InetSocketAddress;
import java.nio.ByteBuffer;
import java.nio.channels.SocketChannel;
import java.nio.charset.StandardCharsets;
import java.util.Scanner;

/**
 * @author zhaojianqiang
 */
public class NioClient {
    public static void main(String[] args) throws IOException {
        while (true) {
            //1.打开通道
            SocketChannel socketChannel = SocketChannel.open();
            //2.设置ip,端口号
            socketChannel.connect(new InetSocketAddress("localhost", 8888));
            //3.写出数据
            System.out.println("请输入: ");
            Scanner sc = new Scanner(System.in);
            String msg = sc.nextLine();
            socketChannel.write(ByteBuffer.wrap(msg.getBytes(StandardCharsets.UTF_8)));
            //4.读取服务器写回的数据
            ByteBuffer readBuffer = ByteBuffer.allocate(1024);
            int read = socketChannel.read(readBuffer);
            System.out.println("服务端消息:" + new String(readBuffer.array(), 0, read, StandardCharsets.UTF_8));
            //5.释放资源
            socketChannel.close();
        }
    }
}
6.Selector(选择器)
6.1 基本介绍
可以用一个线程,处理多个的客户端连接,就会使用到NIO的Selector(选择器). Selector 能够检测多个注册的服务端通道上是否有事件发生,如果有事件发生,便获取事件然后针对每个事件进行相应的处理。这样就可以只用一个单线程去管理多个通道,也就是管理多个连接和请求。

只有在通道真正有读写事件发生时,才会进行读写,就大大地减少了系统开销,并且不必为每个连接都创建一个线程,不用去维护多个线程, 避免了多线程之间的上下文切换导致的开销
6.2 常用api介绍
- Selector是一个抽象类
- Selector.open() : //得到一个选择器对象
- selector.select() : //阻塞 监控所有注册的通道,当有对应的事件操作时, 会将SelectionKey放入集合内部并返回事件数量
- selector.select(1000): //阻塞 1000 毫秒,监控所有注册的通道,当有对应的事件操作时, 会将SelectionKey放入集合内部并返回
- elector.selectedKeys() : // 返回存有SelectionKey的集合
- SelectionKey
- SelectionKey.isAcceptable(): 是否是连接继续事件
- SelectionKey.isConnectable(): 是否是连接就绪事件
- SelectionKey.isReadable(): 是否是读就绪事件
- SelectionKey.isWritable(): 是否是写就绪事件
- SelectionKey中定义的4种事件
- SelectionKey.OP_ACCEPT —— 接收连接继续事件,表示服务器监听到了客户连接,服务器可以接收这个连接了
- SelectionKey.OP_CONNECT —— 连接就绪事件,表示客户端与服务器的连接已经建立成功
- SelectionKey.OP_READ —— 读就绪事件,表示通道中已经有了可读的数据,可以执行读操作了(通道目前有数据,可以进行读操作了)
- SelectionKey.OP_WRITE —— 写就绪事件,表示已经可以向通道写数据了(通道目前可以用于写操作)
6.3 示例代码
服务端实现步骤
打开一个服务端通道
绑定对应的端口号
通道默认是阻塞的,需要设置为非阻塞
创建选择器
将服务端通道注册到选择器上,并指定注册监听的事件为OP_ACCEPT
检查选择器是否有事件
获取事件集合
判断事件是否是客户端连接事件SelectionKey.isAcceptable()
得到客户端通道,并将通道注册到选择器上, 并指定监听事件为OP_READ
判断是否是客户端读就绪事件SelectionKey.isReadable()
得到客户端通道,读取数据到缓冲区
给客户端回写数据
从集合中删除对应的事件, 因为防止二次处理.
package channel;

import java.io.IOException;
import java.net.InetSocketAddress;
import java.nio.ByteBuffer;
import java.nio.channels.SelectionKey;
import java.nio.channels.Selector;
import java.nio.channels.ServerSocketChannel;
import java.nio.channels.SocketChannel;
import java.nio.charset.StandardCharsets;
import java.util.Iterator;
import java.util.Set;

/**
 * @author zhaojianqiang
 */
public class NioSelectorServer {
    public static void main(String[] args) throws IOException {
        //1.打开一个服务通道
        ServerSocketChannel serverSocketChannel = ServerSocketChannel.open();
        //2.绑定端口
        serverSocketChannel.bind(new InetSocketAddress(8888));
        //3.设置为非阻塞
        serverSocketChannel.configureBlocking(false);
        //4.创建选择器
        Selector selector = Selector.open();
        //5.将服务端通道注册到选择器上,并指定注册监听的事件为  OP_ACCEPT
        serverSocketChannel.register(selector, SelectionKey.OP_ACCEPT);
        System.out.println("服务端启动成功------------------------");


        while (true) {
            //6.检查选择器是否有事件
            int select = selector.select(2000);
            if (select == 0) {
                System.out.println("客户端未连接,继续等待........");
                continue;
            }

            //7.获取事件集合
            Set<SelectionKey> selectionKeys = selector.selectedKeys();
            Iterator<SelectionKey> iterator = selectionKeys.iterator();
            while (iterator.hasNext()) {
                //8. 判断事件是否是客户端连接事件SelectionKey.isAcceptable()
                SelectionKey key = iterator.next();

                if (key.isAcceptable()) {
                    //9. 得到客户端通道,并将通道注册到选择器上, 并指定监听事件为OP_READ
                    SocketChannel socketChannel = serverSocketChannel.accept();
                    System.out.println("客户端已连接......." + socketChannel);
                    //必须设置为非阻塞,因为selector需要轮询监听每个通道的事件
                    socketChannel.configureBlocking(false);
                    //并指定监听事件为OP_READ
                    socketChannel.register(selector, SelectionKey.OP_READ);
                } else if (key.isReadable()) {
                    //10. 判断是否是客户端读就绪事件SelectionKey.isReadable()
                    //11.得到客户端通道,读取数据到缓冲区
                    SocketChannel socketChannel = (SocketChannel) key.channel();
                    ByteBuffer byteBuffer = ByteBuffer.allocate(1024);
                    int read = socketChannel.read(byteBuffer);
                    if (read > 0) {
                        System.out.println("客户端消息:" + new String(byteBuffer.array(), 0, read, StandardCharsets.UTF_8));
                        //13.给客户端回写数据
                        socketChannel.write(ByteBuffer.wrap("收到".getBytes(StandardCharsets.UTF_8)));
                        socketChannel.close();
                    }
                }

                //13.从集合中删除对应的事件,防止二次处理
                iterator.remove();
            }
        }
    }
}